|
|
The T-Shirt Quilt
or
Memory Quilt
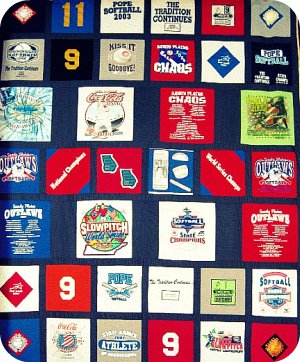
Why a T-shirt Quilt? Well, if you’re like me, you probably have a drawer or drawers in your house filled with “souvenir” t-shirts. Or maybe you have a trash bag, or other storage container filled with t-shirts of years gone by. My daughter played softball for many years, and accumulated many, many T-shirts from various tournaments, teams, and other events. Ask any kid, and you’ll probably get the same answer – those t-shirts are just too precious to give or throw away – or deliver to the rag pile heaven forbid.

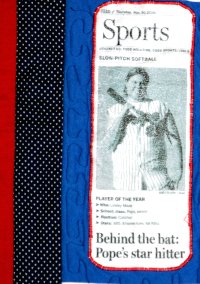
The solution – make or have made a T-shirt quilt. What a great way to consolidate the t-shirts, and the memories while recovering that storage space and reducing clutter all at the same time. And, if well made, your T-shirt quilt, along with its memories will last a lifetime. That's why they can be considered a type of Memory Quilt. And you don’t have to stop at T-shirts. There’s almost an endless supply of things you can include on your memory quilt including photos, patches, newspaper articles (yep, we’ll show you an example), and all sorts of things either on fabric, or that can be transferred to fabric. We’ll cover the details of a Photo Quilt on another page though. One of our favorite T-shirt Quilters, Linda Basler provides a step-by-step method for making a high quality t-shirt quilt if you have some basic quilting skills and tools. Otherwise you can request information from Linda on getting her to make you a professional looking T-shirt quilt. They’re great for graduation, birthday, and holiday gifts. - Start by collecting your T-shirts. The one Linda made for us included about 40 T-shirts, and was a pretty big quilt at 84” x 106” (7 ft x nearly 9 ft). Typical mattress sizes are:
- Twin: 39” x 80”
- Full: 54” x 75”
- Queen: 60” x 80”
- King: 76” x 80”
- Next, you wash and dry all the T-shirts with No Additives or fabric softener. Additives like fabric softener will prevent the T-shirt from adhering to the interface backing material.
- Choose the largest design on a T-shirt and then try to cut all the other T-shirt designs to match that size so that the squares on the quilt are basically equal in size.
- Rough cut the T-shirt up the side seams, and around the neckline and arms until you have the memorable part of the t-shirt separated from the rest of the T-shirt.
- Iron on interface backing behind each t-shirt to stabilize and keep them from loosing their shape. By attaching backing prior to your final cut, you ensure the entire backside of the block will be covered with backing and will help prevent stretching. Interface backing can be purchased from most fabric stores. Ensure there are no wrinkles when ironing on interfacing.
- Next cut your T-shirts with their interface backing into squares or rectangles. Basically it’s easiest to work with squares and rectangles. Other shapes can be used if the T-shirt design pattern dictates.

- Photo Blocks: You can choose to add a photo block to your T-shirt quilt. We’ll cover that procedure on another page. You would use specially treated fabric with your laser jet printer. Follow the instructions that come with this specially treated fabric. Then incorporate the photo block into your quilt just like the other blocks. Linda scanned in a newspaper article, and printed it on fabric for our quilt.
- Layout the T-shirts on a table or the floor, in the design or pattern of your choice. It’s best to balance your colors by laying out your T-shirts until you have a pleasing quilt design. You may not want two T-shirts of the same color right next to each other. However, if your creative juices decide otherwise – go for it!
- It helps to sketch out on paper your quilt pattern which includes the T-shirt blocks layout (and dimensions) with the sashing (and dimensions) between them. Fine tune pattern details e.g. 12” T-shirt square with a 2” sashing and ¼ inch seam allowance. Your block sizes and sashing may vary if your t-shirt design sizes vary.
- Determine the sashing materials that you will use. Look at the T-shirt color scheme and choose a nice matching sashing. You can choose to have long strips of sashing or choose shorter strips with cornerstone squares at the block intersections depending on how fancy you want to get.
- Determine sashing lengths and cut out the sashing.
- Ensure you provide at least ¼” seam allowance on all sides of your sashing.
- Personalize a Block. As an added option to personalize, one idea Linda likes to use is to take a blank piece of T-shirt (like the back of a t-shirt) iron on interface backing, and embroider a message or picture to create a personalized block.
- With the quilt top (T-shirt squares and sashing) laid out, determine the quilt top dimensions.
- Now decide what you will use for the quilt backing. You may want to use the same fabric as the sashing, or some other complementary fabric. Or even piece it with the backs of the T-shirts.
- Then cut out or piece together your backing.
- Next collect your batting material and cut it to the appropriate size to match your quilt top and backing size.
Now assembly begins.
If you have a quilting table with measurement lines, use it to square your blocks and sashing to ensure even seams. - Now lay your backing fabric face down on the floor or your table, and place your batting on top.
- Next lay your quilt top face up on top of the batting.
- Then make sure the 3 layers are secured by either pinning, or use basting stitches.

- Decide what type of quilting pattern you are going to use to hold your T-shirt quilt together e.g. straight line quilting or stipple (free motion) quilting. You may choose to add a design to some, or your entire quilt. On the right you can see how a stipple quilting pattern might look.
- Now do all your quilting, starting from the center and working outward. Linda tells us that originally she only did the “stitch in the ditch” method, meaning she only stitched along the seam lines of the squares and not on the T-shirt squares. She has since learned that it makes for a much better quality T-shirt quilt if you run your quilting lines through your T-shirts. It really helps to keep the batting materials in place, and makes for a firmer higher quality quilt.
- Once your quilting is complete, it’s time to square up your quilt. Make sure you have equal sizing top to bottom and side to side. If it is not even, even it up by carefully trimming the top, sides, and bottom of the quilt as necessary. You will have one more chance to do some vary minor squaring when you attach the binding.
- Next add the Binding to your T-shirt quilt. A double fold binding where the binding has two layers of binding fabric on the front side and two layers on the backside makes for a quality, longer lasting quilt.
Quality Tip: Cutting the binding fabric on the “bias” which means cutting the fabric diagonally across the weave, cutting corner to corner, rather than in line with the weave gives a much better quality to the binding. The binding fabric then is a little stretchier, and will provide more stability to the binding as well as preventing it from wearing out as fast. It also allows you to go around the corners a littler more easily. When the binding fabric is cut on the straight, and a single thread breaks, that will affect the entire length of the binding. However, when cut on the bias, any given thread is much shorter, and a break will only impact a very small section of the binding. - When going around a square corner with your binding, use a mitered corner by folding the binding fabric so it looks like a sharp 90 degree corner then turn the quilt over and stitch the binding fabric down.
- If you find that you didn’t get the "squaring up" step perfect, you can fudge a little when the binding is applied to the outer edges. You do what is called “easing” where you equally distribute the extra length throughout the length of the binding. This makes for a t-shirt quilt that looks square, rather than lopsided.
Quality Tip: Typically you sew the topside of your binding with a sewing machine, and then you flip it over and sew the backside by hand. This will make your quilt look really sharp and clean by hiding the backside stitches. If you don’t want to hand sew the backside, you may choose to use a decorative stitch if your machine provides that function.
Now go out there and get ‘em. That is, get control of all those T-shirts, and make a great gift (to yourself or for someone else) by making or having made, a great T-shirt Quilt. Or if you decide you'd just like to get one made, request information from Linda.
Return from T-shirt Quilt to Quilting
|
|
Appreciate when you Find us and Follow us... 
Have a
Memory Quilt MadeFill out
Info Request Form here. | Quilt Type | # of Shirts | Approx. Size* | Price | | Wall Hanging | 9 | 57" x 57" or smaller | $225 | | Lap | 12 | 45" x 60" | $250 | | Twin | 20 | 60" x 90" | $300 | | Full/Double | 30 | 75" x 90" | $350 | | Queen | 42 | 90" x 106" | $400 |
| *Size may vary slightly. Other sizes may be available upon request |
Photos provided in the .JPG format will be printed on white fabric sheets and incorporated into the quilt for $10 per 8x10 photo. If desired, you may put 2-5x7 photos or 4-3x5 photos on one sheet. Each 8x10 sheet counts as one square. Note: Brothers-Handmade works with one Quilter (Linda) for these T-shirt quilts. Christmas and Spring Graduation are the busiest times. If interested, don't wait.It takes time to make these quality quilts, and you'll be placed in the queue in the order your request is finalized. Fill out Info Request Form here.
|